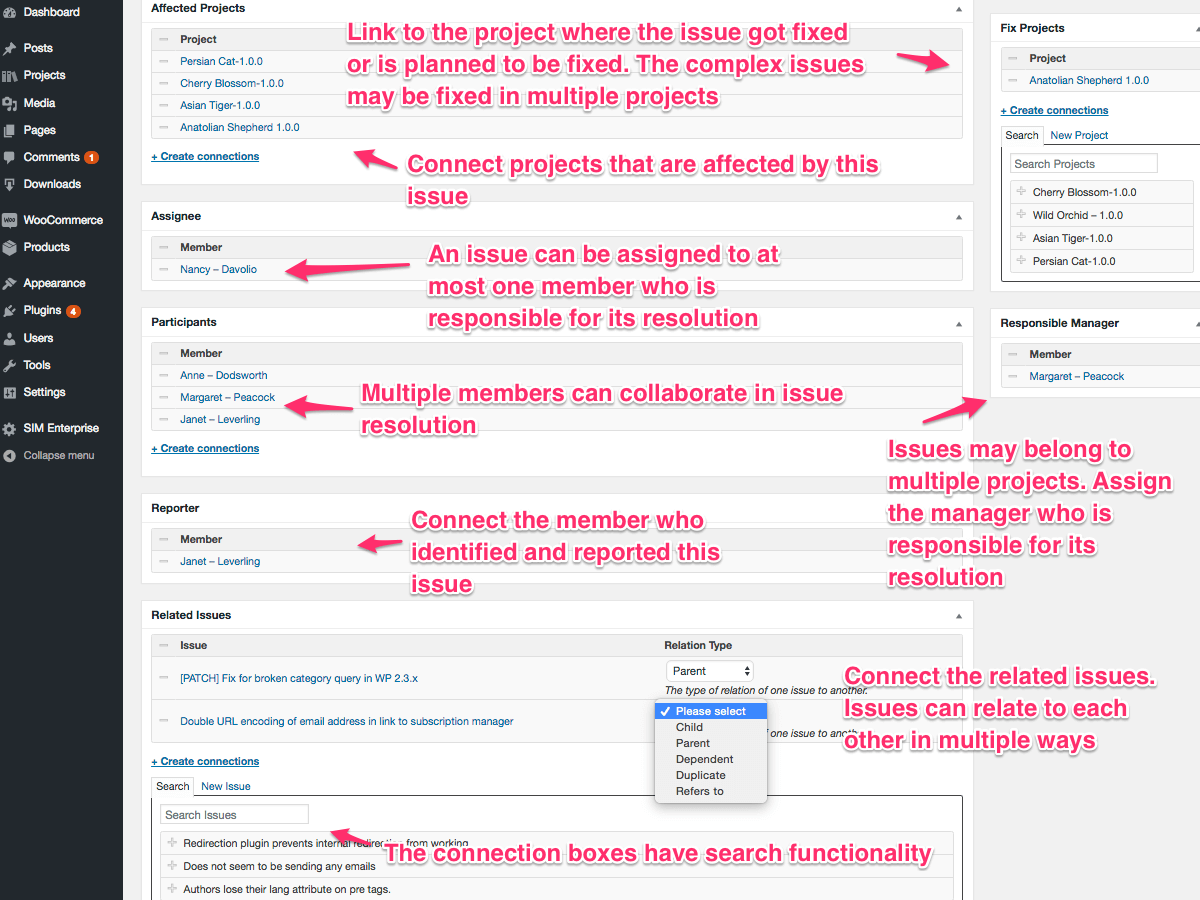
Members are human resources who could be assigned to handle issues.
The following are the preset values for "Country:"
Afghanistan, Åland Islands, Albania, Algeria, American Samoa, Andorra, Angola, Anguilla, Antarctica, Antigua And Barbuda, Argentina, Armenia, Aruba, Australia, Austria, Azerbaijan, Bahamas, Bahrain, Bangladesh, Barbados, Belarus, Belgium, Belize, Benin, Bermuda, Bhutan, Bolivia, Bosnia And Herzegovina, Botswana, Bouvet Island, Brazil, British Indian Ocean Territory, Brunei Darussalam, Bulgaria, Burkina Faso, Burundi, Cambodia, Cameroon, Canada, Cape Verde, Cayman Islands, Central African Republic, Chad, Chile, China, Christmas Island, Cocos (Keeling) Islands, Colombia, Comoros, Congo, Congo, The Democratic Republic Of The, Cook Islands, Costa Rica, Cote D\'ivoire, Croatia, Cuba, Cyprus, Czech Republic, Denmark, Djibouti, Dominica, Dominican Republic, Ecuador, Egypt, El Salvador, Equatorial Guinea, Eritrea, Estonia, Ethiopia, Falkland Islands (Malvinas), Faroe Islands, Fiji, Finland, France, French Guiana, French Polynesia, French Southern Territories, Gabon, Gambia, Georgia, Germany, Ghana, Gibraltar, Greece, Greenland, Grenada, Guadeloupe, Guam, Guatemala, Guernsey, Guinea, Guinea-bissau, Guyana, Haiti, Heard Island And Mcdonald Islands, Holy See (Vatican City State), Honduras, Hong Kong, Hungary, Iceland, India, Indonesia, Iran, Islamic Republic Of, Iraq, Ireland, Isle Of Man, Israel, Italy, Jamaica, Japan, Jersey, Jordan, Kazakhstan, Kenya, Kiribati, Korea, Democratic People\'s Republic Of, Korea, Republic Of, Kuwait, Kyrgyzstan, Lao People\'s Democratic Republic, Latvia, Lebanon, Lesotho, Liberia, Libyan Arab Jamahiriya, Liechtenstein, Lithuania, Luxembourg, Macao, Macedonia, The Former Yugoslav Republic Of, Madagascar, Malawi, Malaysia, Maldives, Mali, Malta, Marshall Islands, Martinique, Mauritania, Mauritius, Mayotte, Mexico, Micronesia, Federated States Of, Moldova, Republic Of, Monaco, Mongolia, Montenegro, Montserrat, Morocco, Mozambique, Myanmar, Namibia, Nauru, Nepal, Netherlands, Netherlands Antilles, New Caledonia, New Zealand, Nicaragua, Niger, Nigeria, Niue, Norfolk Island, Northern Mariana Islands, Norway, Oman, Pakistan, Palau, Palestinian Territory, Occupied, Panama, Papua New Guinea, Paraguay, Peru, Philippines, Pitcairn, Poland, Portugal, Puerto Rico, Qatar, Reunion, Romania, Russian Federation, Rwanda, Saint Helena, Saint Kitts And Nevis, Saint Lucia, Saint Pierre And Miquelon, Saint Vincent And The Grenadines, Samoa, San Marino, Sao Tome And Principe, Saudi Arabia, Senegal, Serbia, Seychelles, Sierra Leone, Singapore, Slovakia, Slovenia, Solomon Islands, Somalia, South Africa, South Georgia And The South Sandwich Islands, Spain, Sri Lanka, Sudan, Suriname, Svalbard And Jan Mayen, Swaziland, Sweden, Switzerland, Syrian Arab Republic, Taiwan, Province Of China, Tajikistan, Tanzania, United Republic Of, Thailand, Timor-leste, Togo, Tokelau, Tonga, Trinidad And Tobago, Tunisia, Turkey, Turkmenistan, Turks And Caicos Islands, Tuvalu, Uganda, Ukraine, United Arab Emirates, United Kingdom, United States, United States Minor Outlying Islands, Uruguay, Uzbekistan, Vanuatu, Venezuela, Viet Nam, Virgin Islands, British, Virgin Islands, U.S., Wallis And Futuna, Western Sahara, Yemen, Zambia, Zimbabwe