Author: eMarket Design
Last Updated: 2017-08-02
Introduction
Helps software organizations respond to issues quickly and consistently.
Concepts
The following is the definition(s) of the concept(s) covered in the context of Software Issue Manager app:
Last Updated: 2014-12-14
Issues
An issue is anything that might affect the project meeting its goals such as bugs, tasks, and feature requests that occur during a project\'s life cycle.
Last Updated: 2014-12-14
Projects
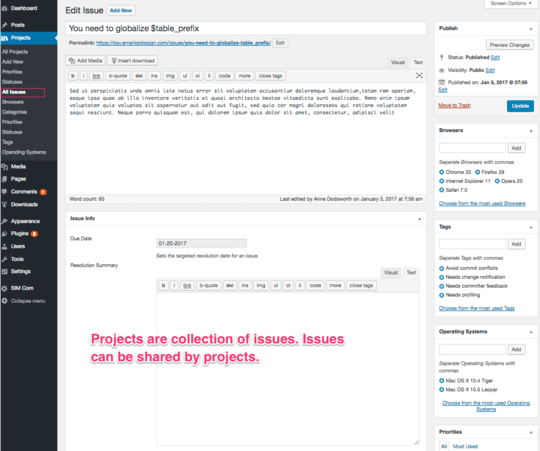
A project is a collection of related issues. Projects have a unique version number, specific start and end dates.
Working with Issues
Using Software Issue Manager, you can create, modify, delete, and search issue records, associated taxonomies, or relationships.
Last Updated: 2017-01-05
Creating Issues
To create issue records in the admin area:
- Log in to your Administration Panel.
- Click the 'Issues' tab.
- Click the 'Add New' sub-tab or the “Add New” button in the issue list page.
- Start filling in your issue fields. You must fill all required fields. All required fields have red star after their labels.
- As needed, set issue taxonomies and relationships. All required relationships or taxonomies must be set.
- When you are ready, click Publish. If you do not have publish privileges, the "Submit for Review" button is displayed.
- After the submission is completed, the issue status changes to "Published" or "Pending Review". Users must have "publish" right to publish issues. Users who do not have "publish" right can still create issues; however, these issues must be reviewed and approved by a user with issue "publish" right. Check Roles and Responsibilities section of this document to see which access groups have issue "publish" right.
Alternatively, you can create issue records using the issue entry form in the frontend by filling out the required fields.
Last Updated: 2014-12-14
Uploading Issue Documents
Issue Documents file can be linked to Issues using the admin backend or using the "issue" entry form in the frontend when creating a new issue. You can upload unlimited number of Documents.
After the issue is created. Only the users who has "publish" right can upload Documents using the issue edit screen.
Last Updated: 2015-06-08
Modifying Issues
Issues can be modified by clicking on the "Edit" link under the issue title in the issue list page in the admin area. Make any necessary changes and then click Publish.
Last Updated: 2014-12-14
Issue Revisions
Issue revisions are stored when you save Issues as a draft or publish an update. The issue revisions allow you to see what changes were made in each revision by dragging a slider (or using the Next/Previous buttons). The display indicates what has changed in each revision - what was added, what remained unchanged, and what was removed. Lines added or removed are highlighted, and individual character changes get additional highlighting. Click the 'Restore This Revision' button to restore a revision.
The revisions page also includes a 'compare any two revisions' mode that allows you to compare any two individual revisions. In this mode, the slider has two handles, one representing the revision you are comparing from and one representing the revision you are comparing to. Drag the handles to see what has changed between any two specific revisions. Note: the 'Restore This Revision' button always restores the revision you are comparing to.
To return top the issue edit screen without restoring a revision, click on the issue title at the top of the page.
Revision history box can be enabled/disabled using the screen option tab at the top of the edit screen. Revision history box details who made the change and when the revision was made.
Last Updated: 2015-06-08
Searching Issues
In Software Issue Manager, users are only allowed to search issues they have access to. Users who have access to issues can search using the filter system in the issue admin areaor search forms in the frontend
Last Updated: 2015-06-08
Scheduling Issues
To schedule Issues for publication on a future time or date in the admin area:
- Log in to your Administration Panel.
- Click the 'Issues' tab.
- Click the 'Add New' sub-tab or the “Add New” button in the issue list page.
- Start filling in your issue fields. You must fill all required fields. All required fields have red star after their labels.
- As needed, set issue taxonomies and relationships. All required relationships or taxonomies must be set.
- When you are ready, click "Edit" in the Publish area next to the words "Publish immediately". You can also change the publish date to a date in the past to back-date Issues. Change the settings to the desired time and date. You must also hit the "Publish" button when you have completed the issue to publish at the desired time and date.
- After the submission is completed, the issue status changes to "Published".
Last Updated: 2015-06-08
Password Protected Issues
To create a password protected issue in the admin area:
- Log in to your Administration Panel.
- Click the 'Issues' tab.
- Click the 'Add New' sub-tab or the “Add New” button in the issue list page.
- Start filling in your issue fields. You must fill all required fields. All required fields have red star after their labels.
- As needed, set issue taxonomies and relationships. All required relationships or taxonomies must be set.
- Click the "Edit" link next to Visibility in the publish box and select "Password protected".
- Enter a password that will be required to view that issue in the text field. The password is limited to 20 characters.
- When you are ready, click the "Publish" button (or "Update" if the issue is already published.)
- After the submission is completed, the issue status changes to "Published".
Only an Administrator and users with "publish" right can change the password set for your issue or modify visibility setting by clicking the "Visibility: Edit" link again.
When issue content is password protected, issue title displays the text "Protected: " before the issue Title and the content prints a password form with this text: "This content is password protected. To view it please enter your password below:".
If multiple issues have the same password, one will only have to enter the required password once. Only one password is tracked at a time so if you visit two different issues with two different password, you must re-enter the issue password to access content. WordPress saves passwords for maximum 10 days. After this period expires, one must reenter the password again to view the protected content.
Last Updated: 2015-06-08
Private Issues
Issues can be privately published to remove them from issue lists and feeds.
To create a private issue in the admin area:
- Log in to your Administration Panel.
- Click the 'Issues' tab.
- Click the 'Add New' sub-tab or the “Add New” button in the issue list page.
- Start filling in your issue fields. You must fill all required fields. All required fields have red star after their labels.
- As needed, set issue taxonomies and relationships. All required relationships or taxonomies must be set.
- Click the "Edit" link next to Visibility in the publish box and select "Private".
- Once you change the visibility to private, the issue status changes to "Privately Published".
- When you are ready, click the "UPDATE" button.
Only an Administrator and users with "publish" right for the issue can change visibility setting by clicking the "Visibility: Edit" link again.
Last Updated: 2014-12-28
Previewing Issues
To preview issue content press the "Preview" button - a button directly above the “publish” button - in the publish box before officially publishing or sending for review.
Last Updated: 2014-12-14
Draft Issues
To create a draft issue in the admin area:
- Log in to your Administration Panel.
- Click the 'Issues' tab.
- Click the 'Add New' sub-tab or the “Add New” button in the issue list page.
- Start filling in your issue fields. You must fill all required fields. All required fields have red star after their labels.
- As needed, set issue taxonomies and relationships. All required relationships or taxonomies must be set.
- When you are ready, click "Save Draft" button in the publish box.
- After the submission is completed, the issue status stays at "Draft".
Last Updated: 2015-07-23
Issue Author
Once the issue is published the user who created the issue is assigned as the issue author. Issue authors can view and edit the issue. One can change the issue author from the author box. The author box drop down is limited to the users who have issue "publish" right.
Last Updated: 2014-12-14
Linking Affected Projects
You can create connections between Projects and Issues by clicking on "Create Connection" link in the "Affected Projects" box and then clicking on "Plus" sign adjacent to the record title you would like to connect. Optionally, you can create new record. If you create a new one, the record is created as a draft. You must publish all connected draft records to make the connections valid.
After the connection created, you can update or publish your issue. You can create as many connections as you need.
Last Updated: 2017-01-05
Creating Custom Fields
Software Issue Manager Community supports creating of custom fields. Creating of custom fields provides a quick way to allow you to extend the content with key/value pairs also known as meta data. Custom fields store arbitrary extra information about issues.
To create a custom fields for your issues
- Edit any issue or create a new one in the admin area. You will see the Custom Fields metabox. if you do not see it, enable it from Screen options.
- Creating a custom field requires a key and a value. The key is constant, but the value can change for each issue. Click on Enter New link or select a key from the dropdown list.
- Enter a value and click Add Custom Field button
- Repeat the steps above for creating more fields
You can create as many custom fields as you need. If your custom field key may have multiple values, create a new field and use the same key with different values. You can use HTML code in the value box. Software Issue Manager concatenates each value separated with a space character. By default, WordPress shows 30 custom fields in the dropdown list.
Once you create issue custom fields, they are displayed in the frontend. The custom fields are available to be for your forms too. You can enable or disable them in the form layouts from SIM Com menu > Settings page > Forms tab . By default all custom fields are disabled.
Last Updated: 2014-12-14
Setting Browsers
Browser can be set by typing the desired option in the empty text field and clicking "Add" button in "Browsers" box and updating/saving the issue. Setting a value for Browser is optional. Browser is also not organized hierarchically meaning there's no relationship from one Browser value to another.
Software Issue Manager comes with a preset Browsers defined in detail in Glossary section of this document. Administrators can always add/remove/modify the list based on your organizational needs. Some widgets created upon installation are based on predefined Browsers.
Last Updated: 2015-06-08
Setting Categories
Category can be set by clicking on the desired option in "Categories" box and updating/saving the issue. Setting a value for Category is optional. Category is also not organized hierarchically meaning there's no relationship from one Category value to another.
Software Issue Manager comes with a preset Categories defined in detail in Glossary section of this document. Administrators can always add/remove/modify the list based on your organizational needs. Some widgets created upon installation are based on predefined Categories.
Last Updated: 2014-12-14
Setting Operating Systems
Operating System can be set by typing the desired option in the empty text field and clicking "Add" button in "Operating Systems" box and updating/saving the issue. Setting a value for Operating System is optional. Operating System is also not organized hierarchically meaning there's no relationship from one Operating System value to another.
Software Issue Manager comes with a preset Operating Systems defined in detail in Glossary section of this document. Administrators can always add/remove/modify the list based on your organizational needs. Some widgets created upon installation are based on predefined Operating Systems.
Last Updated: 2015-06-08
Setting Priorities
Priority can be set by clicking on the desired option in "Priorities" box and updating/saving the issue. Setting a value for Priority is optional. Priority is also not organized hierarchically meaning there's no relationship from one Priority value to another.
Software Issue Manager comes with a preset Priorities defined in detail in Glossary section of this document. Administrators can always add/remove/modify the list based on your organizational needs. Some widgets created upon installation are based on predefined Priorities.
Last Updated: 2015-06-08
Setting Statuses
Status can be set by clicking on the desired option in "Statuses" box and updating/saving the issue. Setting a value for Status is optional. Status is also not organized hierarchically meaning there's no relationship from one Status value to another.
Software Issue Manager comes with a preset Statuses defined in detail in Glossary section of this document. Administrators can always add/remove/modify the list based on your organizational needs. Some widgets created upon installation are based on predefined Statuses.
Last Updated: 2014-12-14
Setting Tags
Tag can be set by typing the desired option in the empty text field and clicking "Add" button in "Tags" box and updating/saving the issue. Setting a value for Tag is optional. Tag is also not organized hierarchically meaning there's no relationship from one Tag value to another.
Tags do not have preset values.
Last Updated: 2015-03-20
Displaying Issues
Displaying Issue archives can be done by creating a link in the Appearance Menus Screen in the admin area.
Alternatively, if you'd like to display a specific Issue, you can select the link from Issue metabox and add it to your menu. If you don't see Issue metabox, check the Screen Options to ensure it is set to display.
To create a custom link for Issue archives:
- Goto Appearance in the admin menu and click on Menus link
- On the right hand side, pick the menu you’d like to include from Select a menu to edit dropdown
- Under Links menu navigation item, type in /issues to the URL field
- Type in Issues or another label describing the custom link URL in the Link Text field
- Click “Add to menu” button to add the item to the menu
- Pick “primary location” under “Menu Settings” below the menu
- Save your menu
- Go to the frontend and click on the link you created to access Issues. Issue archive page content is only displayed to the authorized users who have access permissions.
Last Updated: 2015-03-20
Email Piping Issues
Issues can be created through emails by purchasing WPAS incoming email extension. After activation of the extension, incoming email link will appear under SIM Com menu in the admin area. WPAS incoming mail extension allows to poll IMAP or POP3 servers, with or without SSL/TLS to receive emails. Polling frequency can be set to allow processing emails in specified intervals.
Using WPAS incoming email extension. You can define specific message processing rules per Issue:
- Deleting emails after creating Issues
- Setting maximum number of emails to post: a handy feature exp; if you want to accept specific number of Issues.
- Protection against spam or unauthorized Issue creation using email pins, authorized addresses, and banned file names.
- Allowing visitors(users who do not have publish capability) to create Issues via email
- Setting default subject for email without any subject line.
- Setting separate Issue post statuses for users and visitors.
- Using shortcodes to categorize emails or to set values.
Email processing activity history is recorded for processing errors or validations.
Incoming email settings can be configured by selecting SIM Com menu in the admin area and clicking on Incoming email link.
Last Updated: 2014-12-28
Locking Issues
In Software Issue Manager, Issues are locked during editing, preventing other users from accessing and modifying the Issue.
If a user clicks to edit one of the Issue records that's currently locked they are presented with three options in a pop-up dialog:
- Go Back - Return to the Issues listing.
- Preview - Preview the current state of the Issue that's being edited.
- Take Over - Lock out the current editor of the Issues and begin editing. (The other user will receive a notification)
The user that has been locked out receives the following dialog, and is no longer able to edit the Issue. It can take up to 15 seconds for the current Issue editor to be notified that another user has taken over.
Working with Projects
Using Software Issue Manager, you can create, modify, delete, and search project records, associated taxonomies, or relationships.
Last Updated: 2017-01-05
Creating Projects
To create project records in the admin area:
- Log in to your Administration Panel.
- Click the 'Projects' tab.
- Click the 'Add New' sub-tab or the “Add New” button in the project list page.
- Start filling in your project fields. You must fill all required fields. All required fields have red star after their labels.
- As needed, set project taxonomies and relationships. All required relationships or taxonomies must be set.
- When you are ready, click Publish. If you do not have publish privileges, the "Submit for Review" button is displayed.
- After the submission is completed, the project status changes to "Published" or "Pending Review". Users must have "publish" right to publish projects. Users who do not have "publish" right can still create projects; however, these projects must be reviewed and approved by a user with project "publish" right. Check Roles and Responsibilities section of this document to see which access groups have project "publish" right.
Last Updated: 2017-01-05
Uploading Project Documents
Project Documents file can be linked to Projects using the admin backend when creating a new project. You can upload unlimited number of Documents.
After the project is created. Only the users who has "publish" right can upload Documents using the project edit screen.
Last Updated: 2015-06-08
Modifying Projects
Projects can be modified by clicking on the "Edit" link under the project title in the project list page in the admin area. Make any necessary changes and then click Publish.
Last Updated: 2015-06-08
Searching Projects
In Software Issue Manager, users are only allowed to search projects they have access to. Users who have access to projects can search using the filter system in the project admin area.
Last Updated: 2015-06-08
Scheduling Projects
To schedule Projects for publication on a future time or date in the admin area:
- Log in to your Administration Panel.
- Click the 'Projects' tab.
- Click the 'Add New' sub-tab or the “Add New” button in the project list page.
- Start filling in your project fields. You must fill all required fields. All required fields have red star after their labels.
- As needed, set project taxonomies and relationships. All required relationships or taxonomies must be set.
- When you are ready, click "Edit" in the Publish area next to the words "Publish immediately". You can also change the publish date to a date in the past to back-date Projects. Change the settings to the desired time and date. You must also hit the "Publish" button when you have completed the project to publish at the desired time and date.
- After the submission is completed, the project status changes to "Published".
Last Updated: 2015-06-08
Password Protected Projects
To create a password protected project in the admin area:
- Log in to your Administration Panel.
- Click the 'Projects' tab.
- Click the 'Add New' sub-tab or the “Add New” button in the project list page.
- Start filling in your project fields. You must fill all required fields. All required fields have red star after their labels.
- As needed, set project taxonomies and relationships. All required relationships or taxonomies must be set.
- Click the "Edit" link next to Visibility in the publish box and select "Password protected".
- Enter a password that will be required to view that project in the text field. The password is limited to 20 characters.
- When you are ready, click the "Publish" button (or "Update" if the project is already published.)
- After the submission is completed, the project status changes to "Published".
Only an Administrator and users with "publish" right can change the password set for your project or modify visibility setting by clicking the "Visibility: Edit" link again.
When project content is password protected, project title displays the text "Protected: " before the project Title and the content prints a password form with this text: "This content is password protected. To view it please enter your password below:".
If multiple projects have the same password, one will only have to enter the required password once. Only one password is tracked at a time so if you visit two different projects with two different password, you must re-enter the project password to access content. WordPress saves passwords for maximum 10 days. After this period expires, one must reenter the password again to view the protected content.
Last Updated: 2015-06-08
Private Projects
Projects can be privately published to remove them from project lists and feeds.
To create a private project in the admin area:
- Log in to your Administration Panel.
- Click the 'Projects' tab.
- Click the 'Add New' sub-tab or the “Add New” button in the project list page.
- Start filling in your project fields. You must fill all required fields. All required fields have red star after their labels.
- As needed, set project taxonomies and relationships. All required relationships or taxonomies must be set.
- Click the "Edit" link next to Visibility in the publish box and select "Private".
- Once you change the visibility to private, the project status changes to "Privately Published".
- When you are ready, click the "UPDATE" button.
Only an Administrator and users with "publish" right for the project can change visibility setting by clicking the "Visibility: Edit" link again.
Last Updated: 2014-12-28
Previewing Projects
To preview project content press the "Preview" button - a button directly above the “publish” button - in the publish box before officially publishing or sending for review.
Last Updated: 2014-12-14
Draft Projects
To create a draft project in the admin area:
- Log in to your Administration Panel.
- Click the 'Projects' tab.
- Click the 'Add New' sub-tab or the “Add New” button in the project list page.
- Start filling in your project fields. You must fill all required fields. All required fields have red star after their labels.
- As needed, set project taxonomies and relationships. All required relationships or taxonomies must be set.
- When you are ready, click "Save Draft" button in the publish box.
- After the submission is completed, the project status stays at "Draft".
Last Updated: 2017-01-05
Project Author
Once the project is published the user who created the project is assigned as the project author. Project authors can view and edit the project. One can change the project author from the author box. The author box drop down is limited to the users who have project "publish" right.
Last Updated: 2017-01-05
Creating Custom Fields
Software Issue Manager Community supports creating of custom fields. Creating of custom fields provides a quick way to allow you to extend the content with key/value pairs also known as meta data. Custom fields store arbitrary extra information about projects.
To create a custom fields for your projects
- Edit any project or create a new one in the admin area. You will see the Custom Fields metabox. if you do not see it, enable it from Screen options.
- Creating a custom field requires a key and a value. The key is constant, but the value can change for each project. Click on Enter New link or select a key from the dropdown list.
- Enter a value and click Add Custom Field button
- Repeat the steps above for creating more fields
You can create as many custom fields as you need. If your custom field key may have multiple values, create a new field and use the same key with different values. You can use HTML code in the value box. Software Issue Manager concatenates each value separated with a space character. By default, WordPress shows 30 custom fields in the dropdown list.
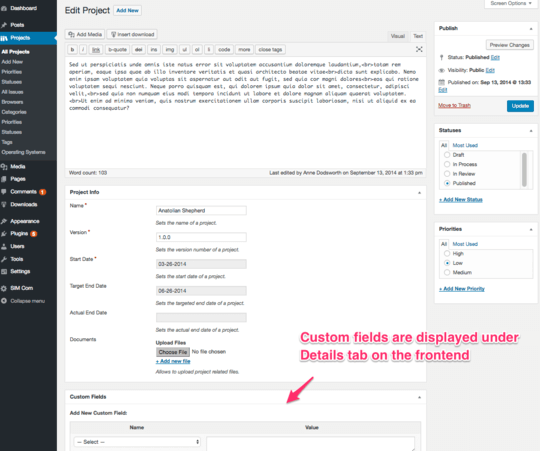
Once you create project custom fields, they are displayed in the frontend.
Last Updated: 2014-12-14
Setting Priorities
Priority can be set by clicking on the desired option in "Priorities" box and updating/saving the project. Setting a value for Priority is required. Priority is also not organized hierarchically meaning there's no relationship from one Priority value to another.
Software Issue Manager comes with a preset Priorities defined in detail in Glossary section of this document. Administrators can always add/remove/modify the list based on your organizational needs. Some widgets created upon installation are based on predefined Priorities.
Last Updated: 2014-12-14
Setting Statuses
Status can be set by clicking on the desired option in "Statuses" box and updating/saving the project. Setting a value for Status is required. Status is also not organized hierarchically meaning there's no relationship from one Status value to another.
Software Issue Manager comes with a preset Statuses defined in detail in Glossary section of this document. Administrators can always add/remove/modify the list based on your organizational needs. Some widgets created upon installation are based on predefined Statuses.
Last Updated: 2015-03-20
Displaying Projects
Displaying Project archives can be done by creating a link in the Appearance Menus Screen in the admin area.
Alternatively, if you'd like to display a specific Project, you can select the link from Project metabox and add it to your menu. If you don't see Project metabox, check the Screen Options to ensure it is set to display.
To create a custom link for Project archives:
- Goto Appearance in the admin menu and click on Menus link
- On the right hand side, pick the menu you’d like to include from Select a menu to edit dropdown
- Under Links menu navigation item, type in /projects to the URL field
- Type in Projects or another label describing the custom link URL in the Link Text field
- Click “Add to menu” button to add the item to the menu
- Pick “primary location” under “Menu Settings” below the menu
- Save your menu
- Go to the frontend and click on the link you created to access Projects. Project archive page content is only displayed to the authorized users who have access permissions.
Last Updated: 2014-12-28
Locking Projects
In Software Issue Manager, Projects are locked during editing, preventing other users from accessing and modifying the Project.
If a user clicks to edit one of the Project records that's currently locked they are presented with three options in a pop-up dialog:
- Go Back - Return to the Projects listing.
- Preview - Preview the current state of the Project that's being edited.
- Take Over - Lock out the current editor of the Projects and begin editing. (The other user will receive a notification)
The user that has been locked out receives the following dialog, and is no longer able to edit the Project. It can take up to 15 seconds for the current Project editor to be notified that another user has taken over.
Widgets
Widgets provide a simple and easy-to-use way of displaying content and features on your sidebars or dashboard.
Sidebar widgets can be added, removed, and rearranged on the WordPress Administration Appearance > Widgets panel. Dashboard widgets can be enabled or disabled using Screen Options tab in your app dashboard page. All widgets have drag-and-drop functionality.
The following sections list the Software Issue Manager widgets:
Last Updated: 2015-01-02
Recent Issues sidebar widget
Recent Issues is an entity sidebar widget. It shows latest 10 published issue records without any page navigation links.
Forms
Forms allow users to enter data that is sent to Software Issue Manager for processing. Forms can be used to enter or retrieve search results related to your content.
The following sections list the Software Issue Manager forms:
Last Updated: 2017-01-13
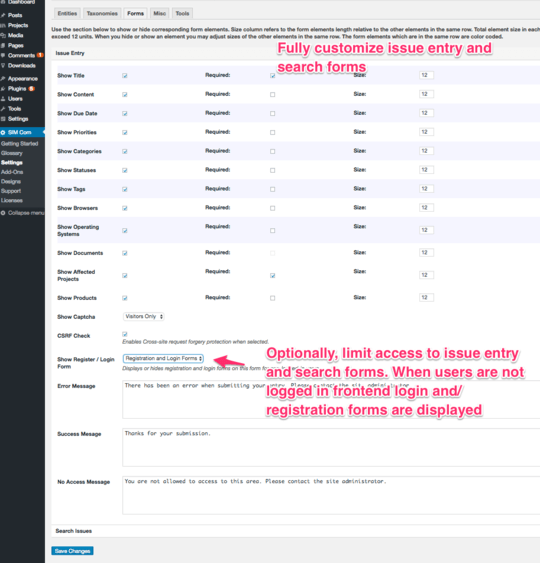
Issue entry
"Issue entry" form is used for entering issue records from the frontend. You can use [issue_entry] shortcode to display it in a page or post of your choise as well.
The following are the fields used in the form:
- Title (text)
- Content (wysiwyg)
- ID (hidden_func)
- Due Date (date)
- Documents (file)
- Form Name (hidden)
- Form Submitted By (hidden_func)
- Form Submitted IP (hidden_func)
- Affected Projects (select-multiple selection allowed)
- Priorities (select-only single selection allowed)
- Statuses (select-only single selection allowed)
- Categories (select-only single selection allowed)
- Tags (select-multiple selection allowed)
- Browsers (select-multiple selection allowed)
- Operating Systems (select-multiple selection allowed)
Last Updated: 2017-01-13
Issue search
"Issue search" form is used for searching issue records from the frontend. You can use [issue_search] shortcode to display it in a page or post of your choise as well.
The following are the fields used in the form:
- ID (hidden_func)
- Due Date (date)
- Affected Projects (select-multiple selection allowed)
- Priorities (select-only single selection allowed)
- Statuses (select-only single selection allowed)
- Categories (select-only single selection allowed)
Last Updated: 2017-07-31
Roles and Capabilities
The following table shows the capabilities and the access roles available in Software Issue Manager app. "Red" color means the users who belong to the corresponding role do not have the capability. "Green" color means the users who belong to the corresponding role have the capability.
| Administrator | Editor | Author | Contributor | Subscriber | EDD Shop Manager | EDD Shop Worker | EDD Shop Accountant | EDD Shop Vendor | WooCommerce Shop Manager | WooCommerce Customer |
|---|
| Edit Issues | | | | | | | | | | | |
| Delete Issues | | | | | | | | | | | |
| Edit Others Issues | | | | | | | | | | | |
| Publish Issues | | | | | | | | | | | |
| Read Private Issues | | | | | | | | | | | |
| Delete Private Issues | | | | | | | | | | | |
| Delete Published Issues | | | | | | | | | | | |
| Delete Others Issues | | | | | | | | | | | |
| Edit Private Issues | | | | | | | | | | | |
| Edit Published Issues | | | | | | | | | | | |
| Manage Operations Issues | | | | | | | | | | | |
| Set Author Issues | | | | | | | | | | | |
| Edit Projects | | | | | | | | | | | |
| Delete Projects | | | | | | | | | | | |
| Edit Others Projects | | | | | | | | | | | |
| Publish Projects | | | | | | | | | | | |
| Read Private Projects | | | | | | | | | | | |
| Delete Private Projects | | | | | | | | | | | |
| Delete Published Projects | | | | | | | | | | | |
| Delete Others Projects | | | | | | | | | | | |
| Edit Private Projects | | | | | | | | | | | |
| Edit Published Projects | | | | | | | | | | | |
| Manage Operations Projects | | | | | | | | | | | |
| Set Author Projects | | | | | | | | | | | |
| Limit by Author Backend Projects | | | | | | | | | | | |
| Limit by Author Frontend Projects | | | | | | | | | | | |
| Limit by Author Backend Issues | | | | | | | | | | | |
| Limit by Author Frontend Issues | | | | | | | | | | | |
| Administrator | Editor | Author | Contributor | Subscriber | EDD Shop Manager | EDD Shop Worker | EDD Shop Accountant | EDD Shop Vendor | WooCommerce Shop Manager | WooCommerce Customer |
|---|
| Manage Priorities | | | | | | | | | | | |
| Edit Priorities | | | | | | | | | | | |
| Delete Priorities | | | | | | | | | | | |
| Assign Priorities | | | | | | | | | | | |
| Manage Statuses | | | | | | | | | | | |
| Edit Statuses | | | | | | | | | | | |
| Delete Statuses | | | | | | | | | | | |
| Assign Statuses | | | | | | | | | | | |
| Manage Categories | | | | | | | | | | | |
| Edit Categories | | | | | | | | | | | |
| Delete Categories | | | | | | | | | | | |
| Assign Categories | | | | | | | | | | | |
| Manage Tags | | | | | | | | | | | |
| Edit Tags | | | | | | | | | | | |
| Delete Tags | | | | | | | | | | | |
| Assign Tags | | | | | | | | | | | |
| Manage Statuses | | | | | | | | | | | |
| Edit Statuses | | | | | | | | | | | |
| Delete Statuses | | | | | | | | | | | |
| Assign Statuses | | | | | | | | | | | |
| Manage Priorities | | | | | | | | | | | |
| Edit Priorities | | | | | | | | | | | |
| Delete Priorities | | | | | | | | | | | |
| Assign Priorities | | | | | | | | | | | |
| Manage Browsers | | | | | | | | | | | |
| Edit Browsers | | | | | | | | | | | |
| Delete Browsers | | | | | | | | | | | |
| Assign Browsers | | | | | | | | | | | |
| Manage Operating Systems | | | | | | | | | | | |
| Edit Operating Systems | | | | | | | | | | | |
| Delete Operating Systems | | | | | | | | | | | |
| Assign Operating Systems | | | | | | | | | | | |
| Administrator | Editor | Author | Contributor | Subscriber | EDD Shop Manager | EDD Shop Worker | EDD Shop Accountant | EDD Shop Vendor | WooCommerce Shop Manager | WooCommerce Customer |
|---|
| All Relationships are open to public. |
| Administrator | Editor | Author | Contributor | Subscriber | EDD Shop Manager | EDD Shop Worker | EDD Shop Accountant | EDD Shop Vendor | WooCommerce Shop Manager | WooCommerce Customer |
|---|
| All Views are open to public. |
Administration
Plugins are managed from the Plugins screen in the Administration Screens of your WordPress site. All Plugins listed on this screen are found in your wp-content/plugins directory. Each Plugin has a description in its header section of what it does, an author and website to refer to, and a version number. Find Software Issue Manager from the list.
Last Updated: 2017-01-05
Installation
To install your Software Issue Manager Plugin using the built-in plugin installer:
- Download Software Issue Manager Plugin to your desktop.
- Go to Plugins "Add New".
- Under Upload, click "Browse".
- Find the software-issue-manager-community-VERSION.zip file.
- Click Install Now to install the Software Issue Manager Plugin.
- A popup window will ask you to confirm your wish to install the Plugin.
- Click Proceed to continue with the installation. The resulting installation screen will list the installation as successful or note any problems during the install.
- If successful, click Activate Plugin to activate it, or Return to Plugin Installer for further actions.
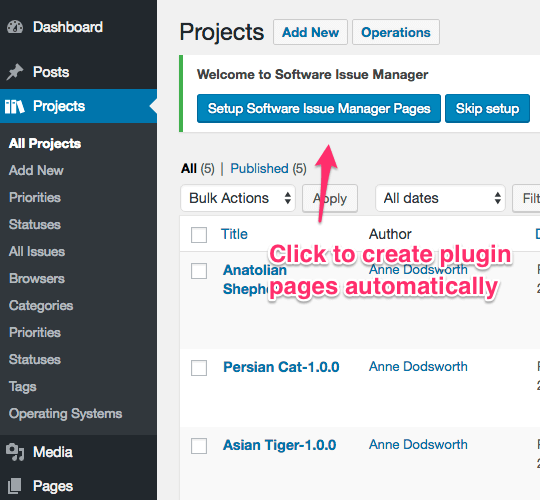
Replace VERSION in instructions with the version number of Software Issue Manager you want to install. After the activation, the Software Issue Manager plugin setup may display notification asking if you if you'd like to install setup pages or skip setup page installation, click the appropriate button.
Last Updated: 2014-12-14
Uninstallation
To uninstall your Software Issue Manager Plugin using the built-in plugin installer:
- Go to Plugins screen.
- Find the Software Issue Manager Plugin you wish to deactivate and uninstall.
- Click Deactivate.
Last Updated: 2017-01-05
Plugin Updates and Upgrades
WordPress auto-update system displays notification in the Admin Bar and also on the plugins page when new version of the Software Issue Manager is available.
To install the new version, simply hit the "Update automatically" button. WordPress will automatically download the new package, extract it and replace the old files. No FTP, removing old files, and uploading is required.
Upgrading your plugin
We offer different plugin editions to better match your needs. If you purchased a different edition of Software Issue Manager, follow the steps below to upgrade your plugin:
- Go WordPress plugins page and deactivate and optionally delete the current Software Issue Manager Community edition.
- Install the new edition based on the instructions in WordPress Codex
- Activate the new edition
- Go to Plugin Settings page and save settings
Upgrading Software Issue Manager Community edition does not have any impact on your existing data but it is always a good idea to back up your WordPress database as a rule of thumb before any changes.
Using Plugin Extensions
Software Issue Manager Community edition is configured to work with many plugin extensions. Most plugin extensions work regardless of the edition unless specified specifically in the plugin page.
if you purchased a plugin extension, follow the instructions in WordPress Codex to install and activate your plugin extension like any other WordPress plugin.
If your extension comes with a license key, you must save and activate your license key to get software updates and support.
Last Updated: 2015-06-08
Modifying Form Fields
Administrators can show, hide, and resize form elements by clicking on the Settings page under SIM Com menu. In addition, form captcha element can be set to "Visitors Only","Always Show", or "Never Show".
Required fields can not be disabled however you can change the column size. The optional fields can be enabled, disabled, or modified to occupy more or less space in the form layout.
Make sure to save your changes after any modification otherwise your changes will not take effect.
Last Updated: 2017-01-05
Changing Entity Base Slug
The default entity base slug can be changed within entity tab of settings page in SIM Com menu. After you update, make sure to refresh your site's Permalinks under Settings. You can only change base slug if post name based permalink structure is selected.
Last Updated: 2017-01-05
Resolving theme related conflicts
For the most part, Software Issue Manager templates will integrate nicely with most WordPress themes. However you may run into issues when the default Software Issue Manager content wrappers do not match your chosen theme or your theme's CSS rules overwrite Software Issue Manager CSS rules.
Theme related issues manifest themselves by;
- Breaking your layout on Software Issue Manager pages and shifting your sidebars into incorrect positions
- Some random text getting displayed in header or footer of your site
- Some sections in plugin pages not getting displayed as in the plugin's demo site.
Theme related issues can potentially affect all single, taxonomy, archive and shortcode pages because Software Issue Manager uses templates of its own to display these pages and it’s impossible for eMDPlugins to know exactly what markup or CSS rules your theme uses.
The following is a
Developer level documentation. If you’re unfamiliar with code/templates and resolving potential conflicts, we strongly suggest to
hire us or a developer to complete the project for you. Please also note that our complimentary support team is unable to assist with customization per our Support Policy.
There are three methods to resolve theme related issues;
- Copying and modifying your theme's header.php and footer.php
- Copying and modifying your theme's page.php
- Adding custom CSS rules
Modifying header.php and footer.php
- Go to your theme's folder -- wp-content/themes/YOURTHEME/
- Copy header.php of your theme as header-emdplugins.php
- Copy footer.php of your theme as footer-emplugins.php
- Remove the conflicting code from header-emdplugins.php and/or footer-emplugins.php.
- This will make Software Issue Manager use these newly created header and footer instead of your theme's default header and footer. Save the files. You’re done.
Copying and modifying your theme's page.php
If the issue can not be resolved through simply modifying the header and footer templates, you need to modify your theme's page.php.
Please note that this approach eliminates Your ability:
- To set page templates for single, archive and taxonomy pages
- To remove page navigation from archive and taxonomy pages.
from SIM Com, settings page.
To set up this template page:
- Duplicate your theme’s page.php file, and name it software-issue-manager.php. This file should be found like this: wp-content/themes/YOURTHEME/software-issue-manager.php.
- Open up your newly created software-issue-manager.php in a text editor, or the editor of your choice.
-
Next you need to find the loop (see The_Loop). The loop usually starts with a:
<?php if ( have_posts() ) :
and usually ends with:
This varies between themes. Once you have found it, delete it. In its place, put:
<?php software_issue_manager_content(); ?>
- This will make your theme use Software Issue Manager’s loop instead. Save the file. You’re done.
Adding CSS rules
You add custom CSS rules in the Custom CSS field of Tools tab under SIM Com menu, settings page to overwrite your theme's default CSS. The custom css rules added in the settings are not deleted when your plugin gets updated.
You can learn CSS language by completing the tutorials at w3schools.com
Last Updated: 2017-01-05
Localization(l10n)
Software Issue Manager can be translated into any language by editing software-issue-manager-emd-plugins.pot and software-issue-manager.pot files.
- software-issue-manager-emd-plugins.pot file is for the components used in Software Issue Manager.
- software-issue-manager.pot file is for the Software Issue Manager specific strings that need to be translated.
Follow the steps below to fully translate Software Issue Manager into the desired language:
- Copy software-issue-manager-emd-plugins.pot as language specific .po file such as software-issue-manager-emd-plugins-tr_TR.po.
- Copy software-issue-manager.pot as language specific .po file such as software-issue-manager-tr_TR.po.
- Use your favorite PO file editor and complete translation strings in the .po files you created.
- When translations are completed, create .mo file of each .po file.
- Create wp-content/languages/software-issue-manager directory
- Put translated .mo files and .po files in the directory above to protect them from getting deleted during plugin updates.
- Change the language to the translated language from Settings > General > Site Language.
- Repeat the process until you get all strings translated
.
Last Updated: 2014-12-14
Screen Options
Screen Options is displayed as a hanging tab under the toolbar. Click on the Screen Options tab to expand the options available for a particular Screen, check (or uncheck) the desired options, then click the Screen Options hanging tab to collapse the Screen Options. Each screen may have a different set of Screen Options.
Edit page screen options allow the user to decide the edit boxes ,such as taxonomies, relationships or specific boxes such as authors, are presented in the edit area. You can turn on and off the ones that are not needed for a particular edit session.
List page screen options allow users to set the number of records displayed in the list table.
Last Updated: 2017-01-05
Customizations
Software Issue Manager offers extensive customization options from plugin settings, settings page. The following customizations can be done without changing your theme's template files:
- Enable or disable all fields, taxonomies and relationships from backend and/or frontend
- Set any entity and/or archive base slug
- Set the page template of any entity, taxonomy and/or archive page to sidebar on left, sidebar on right or no sidebar (full width)
- Hide the previous and next post links on the frontend for single posts
- Hide the page navigation links on the frontend for archive posts
- Display or hide any custom field
- Display any side bar widget on plugin pages using EMD Widget Area
- Set custom CSS rules for all plugin pages including plugin shortcodes
If your customization requirements are more complex and can not be resolved through the list of options provided above, you need to implement advanced customization techniques.
Advanced Customizations
Note:The following is a
Developer level documentation. If you’re unfamiliar with code/templates/localization and resolving potential conflicts, we strongly suggest to
hire us or a developer to complete the project for you. Please also note that our complimentary support team is unable to assist with customization per our Support Policy.
Software Issue Manager advanced customization can be done on 3 different areas;
- Look & Feel - changing layout and overall presentation of content
- Functionality - adding, deleting or modifying existing plugin functionality
- Strings - changing the field names
Plugin customization can be implemented by using 4 different methods:
Customizing functionality
If you'd like to modify the functionality, you need to modify the plugin design (sold separately) using WP App Studio ProDev API access (sold separately and monthly development plans are available).
If you like to customize how HTML elements are to be displayed on screen, you can add custom CSS rules with higher specificity to your theme's style.css file.
If you'd like to customize layouts of Software Issue Manager, Please follow the steps below:
- Create "emd_templates" directory under your theme's directory.
- Copy the layout files that you want to customize into "emd_templates" directory which you created in step 1 from PLUGIN-ROOT/layouts directory
- Modify the file based on your needs
The layout files you added in the "emd_templates" has always precedence over the plugin's layout files. If the customized files get deleted, the layouts which came with your plugin are displayed. We recommend that you create a child theme if you'd like to minimize the risk of accidental deleting of the "emd_templates" directory because of theme updates.
The following layout file types can be customized:
- Single view page
- Archive view page
- Taxonomy view page
- Search form result page
- Standard list page
- Integration page
- Org chart record and tooltip layout page
Customizing strings
Software Issue Manager labels and messages can be customized to better match your needs through language files. The customization is very similar to localization but recommended for US English users only. If your language is different than US English, you should localize instead of customize. The customization can be done for the strings included in software-issue-manager-emd-plugins.pot and software-issue-manager.pot files.
The following steps cover the string customization of labels and messages.
- software-issue-manager-emd-plugins.pot file is for the translatable strings of components used in Software Issue Manager.
- software-issue-manager.pot file is for the Software Issue Manager specific strings that need to be translated.
Follow the steps below to fully customize Software Issue Manager labels and messages:
- Copy software-issue-manager-emd-plugins.pot as language specific .po file such as software-issue-manager-emd-plugins-en_US.po.
- Copy software-issue-manager.pot as language specific .po file such as software-issue-manager-en_US.po.
- Use your favorite PO file editor or plugin and complete customization of strings in the .po files you created.
- When customization are completed, create .mo file of each .po file.
- Create wp-content/languages/software-issue-manager directory.
- Put customized .mo files and .po files in the directory above to protect them from getting deleted during plugin updates.
- Repeat the process until you get all strings customized. If you do not need a string to be customizes, leave it as it is.
All customization can be done by yourself or emarketdesign.com. Open a support ticket, if you prefer us to do the customization for you.
Glossary
Below is the list of attribute and taxonomy definitions.
Last Updated: 2017-01-05
Issue
An issue is anything that might affect the project meeting its goals such as bugs, tasks, and feature requests that occur during a project\'s life cycle.
- Title
- Title is a required field. Title does not have a default value.
- Content
- Content does not have a default value.
- ID
- Sets a unique identifier for an issue. Being a unique identifier, it uniquely distinguishes each instance of Issue entity. ID does not have a default value.
- Due Date
- Sets the targeted resolution date for an issue. Due Date does not have a default value.
- Resolution Summary
- Sets a brief summary of the resolution of an issue. Resolution Summary does not have a default value.
- Documents
- Allows to upload files related to an issue. Documents does not have a default value.
- Form Name
- Form Name is filterable in the admin area. Form Name has a default value of "admin".
- Form Submitted By
- Form Submitted By is filterable in the admin area. Form Submitted By does not have a default value.
- Form Submitted IP
- Form Submitted IP is filterable in the admin area. Form Submitted IP does not have a default value.
- Browser
- Sets the browser version that an issue may be reproduced in. Browser accepts multiple values like tags. Browser does not have a default value.
The following are the preset values for "Browser:"
Chrome 33, Internet Explorer 11, Safari 7.0, Opera 20, Firefox 29
- Category
- Sets the category that an issue belongs to. Category accepts multiple values like tags. Category has a default value of: 'bug'.
The following are the preset values and value descriptions for "Category:"
| Bug | Bugs are software problems or defects in the system that need to be resolved. |
| Feature Request | Feature requests are functional enhancements submitted by clients. |
| Task | Tasks are activities that need to be accomplished within a defined period of time or by a deadline to resolve issues. |
- Priority
- Sets the priority level assigned to an issue. Priority accepts multiple values like tags. Priority has a default value of: 'normal'.
The following are the preset values and value descriptions for "Priority:"
| Critical | Critical bugs either render a system unusable (not being able to create content or upgrade between versions, blocks not displaying, and the like), cause loss of data, or expose security vulnerabilities. These bugs are to be fixed immediately. |
| Major | Issues which have significant repercussions but do not render the whole system unusable are marked major. An example would be a PHP error which is only triggered under rare circumstances or which affects only a small percentage of all users. These issues are prioritized in the current development release and backported to stable releases where applicable. Major issues do not block point releases. |
| Normal | Bugs that affect one piece of functionality are normal priority. An example would be the category filter not working on the database log screen. This is a self-contained bug and does not impact the overall functionality of the software. |
| Minor | Minor priority is most often used for cosmetic issues that don\'t inhibit the functionality or main purpose of the project, such as correction of typos in code comments or whitespace issues. |
- Status
- Sets the current status of an issue. Status accepts multiple values like tags. Status has a default value of: 'open'.
The following are the preset values and value descriptions for "Status:"
| Open | This issue is in the initial state, ready for the assignee to start work on it. |
| In Progress | This issue is being actively worked on at the moment. |
| Reopened | This issue was once \'Resolved\' or \'Closed\', but is now being re-visited, e.g. an issue with a Resolution of \'Cannot Reproduce\' is Reopened when more information becomes available and the issue becomes reproducible. The next issue states are either marked In Progress, Resolved or Closed. |
| Closed | This issue is complete. |
| Resolved - Fixed | A fix for this issue has been implemented. |
| Resolved - Won\'t Fix | This issue will not be fixed, e.g. it may no longer be relevant. |
| Resolved - Duplicate | This issue is a duplicate of an existing issue. It is recommended you create a link to the duplicated issue by creating a related issue connection. |
| Resolved - Incomplete | There is not enough information to work on this issue. |
| Resolved - CNR | This issue could not be reproduced at this time, or not enough information was available to reproduce the issue. If more information becomes available, reopen the issue. |
- Tag
- Allows to tag issues to further classify or group related issues. Tag accepts multiple values like tags. Tag does not have a default value.
There are no preset values for "Tag":
- Operating System
- Sets the operating system(s) that an issue may be reproduced in. Operating System accepts multiple values like tags. Operating System does not have a default value.
The following are the preset values for "Operating System:"
Windows 8 (32-bit and 64-bit), Windows 7 (32-bit and 64-bit), Windows Vista (32-bit and 64-bit), Windows XP (32-bit and 64-bit), Windows Server 2008 R2 (64-bit), Windows Server 2008 (32-bit and 64-bit), Windows Server 2003 (32-bit and 64-bit), Windows 2000 SP4, Mac OS X 10.8 Mountain Lion (32-bit and 64-bit), Mac OS X 10.7 Lion (32-bit and 64-bit), Mac OS X 10.6 Snow Leopard (32-bit), Mac OS X 10.5 Leopard, Mac OS X 10.4 Tiger, Linux (32-bit and 64-bit versions, kernel 2.6 or compatible)
- Affected Projects
- Allows to display and create connections with Projects. One instance of Issues can associated with many instances of Projects, and vice versa. The relationship can be set up in the edit area of Issues using Affected Projects relationship box. This relationship is required when publishing new Issues.
Last Updated: 2014-12-14
Project
A project is a collection of related issues. Projects have a unique version number, specific start and end dates.
- Content
- Content does not have a default value.
- Name
- Sets the name of a project. Name is a required field. Being a unique identifier, it uniquely distinguishes each instance of Project entity. Name does not have a default value.
- Version
- Sets the version number of a project. Version is a required field. Being a unique identifier, it uniquely distinguishes each instance of Project entity. Version has a default value of "V1.0.0".
- Start Date
- Sets the start date of a project. Start Date is a required field. Start Date does not have a default value.
- Target End Date
- Sets the targeted end date of a project. Target End Date does not have a default value.
- Actual End Date
- Sets the actual end date of a project. Actual End Date does not have a default value.
- Documents
- Allows to upload project related files. Documents does not have a default value.
- Priority
- Sets the current priority of a project. Priority accepts multiple values like tags. Priority has a default value of: 'medium'. Priority is a required field therefore must be assigned to a value.
The following are the preset values for "Priority:"
Low, Medium, High
- Status
- Sets the current status of a project. Status accepts multiple values like tags. Status has a default value of: 'draft'. Status is a required field therefore must be assigned to a value.
The following are the preset values for "Status:"
Draft, In Review, Published, In Process
- Project Issues
- Allows to display and create connections with Issues. One instance of Projects can associated with many instances of Issues, and vice versa. The relationship can be set up in the edit area of Issues using Affected Projects relationship box. This relationship is required when publishing new Projects.